Data Science Resources
©2020 Symbolix Pty Ltd |
Template by Bootstrapious.com
& ported to Hugo by Kishan B
Why and how to test your Shiny apps
Shiny is excellent tool for making dashboards and one that we often use, but if you’ve ever made a Shiny app you’ve probably experienced the frustration of things not working quite the way you intended.
In this post, I’ll explain how
testing Shiny apps can help make them more robust and ultimately save you time. We’ll explore examples showing how you can test
functionality of your Shiny app using
testthat, shinytest, and the shiny::testServer() function.
Throughout this post, I assume you’re already familiar with the testthat package, which is used for automated testing. If not, you can read much more about how to use it in the chapter on testing in the R Packages book.
Why should I write tests?
It might seem like writing tests adds a lot of overhead, but in fact including tests can ultimately save you a lot of time and pain.
Here are some advantages to testing your Shiny apps (and of testing more generally):
Less need for manual testing. Often testing that your app behaves as expected requires selecting several inputs manually. This can be very tedious, especially if you go through several cycles of updating your code and then testing it works. With automated testing you can test your app’s functionality without needing to interact with it directly. This also reduces human error.
Easier debugging. Well-written tests will test your assumptions about how the code works. This allows you to quickly identify where exactly something is not working as intended without needing to add a bunch of print statements throughout your code.
Be able to confidently refactor your code in the future. If you have a easy way to make sure your Shiny app is performing as expected, you can make changes to your code without needing to worry that you’ve broken something.
What do I need to test?
Although the kinds of tests you need will depend on your specific application, in general you should consider the following:
- Do functions used in the app work as expected? This doesn’t require any Shiny-specific tools and can be accomplished using the testthat package. I won’t be discussing this type of testing here.
- Does the reactive flow of my app work? This involves confirming that reactives
and outputs update when expected and have the expected values. The main tool we’ll
use for testing this is the
testServer()function, though we’ll see this does have some limitations. - Do JavaScript-dependent components work? For these tests we’ll use the shinytest package.
- Does the app look the way it should? Again, here we’ll use the shinytest package.
- How does the app perform under load? I won’t be discussing this here, but you can the shinyloadtest package can be used for load testing.
Essential tools for testing Shiny apps
The two main tools I’ll be using are the shinytest package and the testServer()
function included in the shiny package. This RStudio article
and the shinytest documentation
are excellent resources for more information.
As the name suggests, testServer() is used to test server functions only.
This can be either the server function defined in server.R or the server function
within a module. You can set inputs and then
pull out reactives and outputs to confirm that they are what you expect. When
testing modules, you can also access returned objects.
Whereas testServer() only
tests the server part of your Shiny app, shinytest can be used to test the UI
part as well. It runs your app in a headless browser, so it’s
much more similar to how an app would actually run.
Though there is a lot of overlap in how they can be used and a lot of tests could be written using either, usually one will be a better choice.
I recommend using testServer() when you need access to the internals of the app
rather than just the outputs.
The shinytest package is a better option if you want to test a part of the app that relies on JavaScript (this includes updating inputs and modal dialogs), or if you’re testing that the app looks as intended.
In practice, you’ll almost certainly find you’ll need to use both tools to
thoroughly test your app. Read on for examples of how and when to use testServer()
and shinytest.
An example shiny app
To demonstrate the different types of tests, I’ve made a simple app. The app uses data collected through the Frog Census run by Melbourne Water. The Frog Census is a citizen science project in which people download an app that they can use to record frog calls. The dataset is available to download here.
The functionality of the Shiny app is very simple: you select which frog species you’re interested in, and observations of those species are shown on the map. If you click on a point on the map, a table will appear with more information about that observation (such as date, time, and the number of frogs observed).
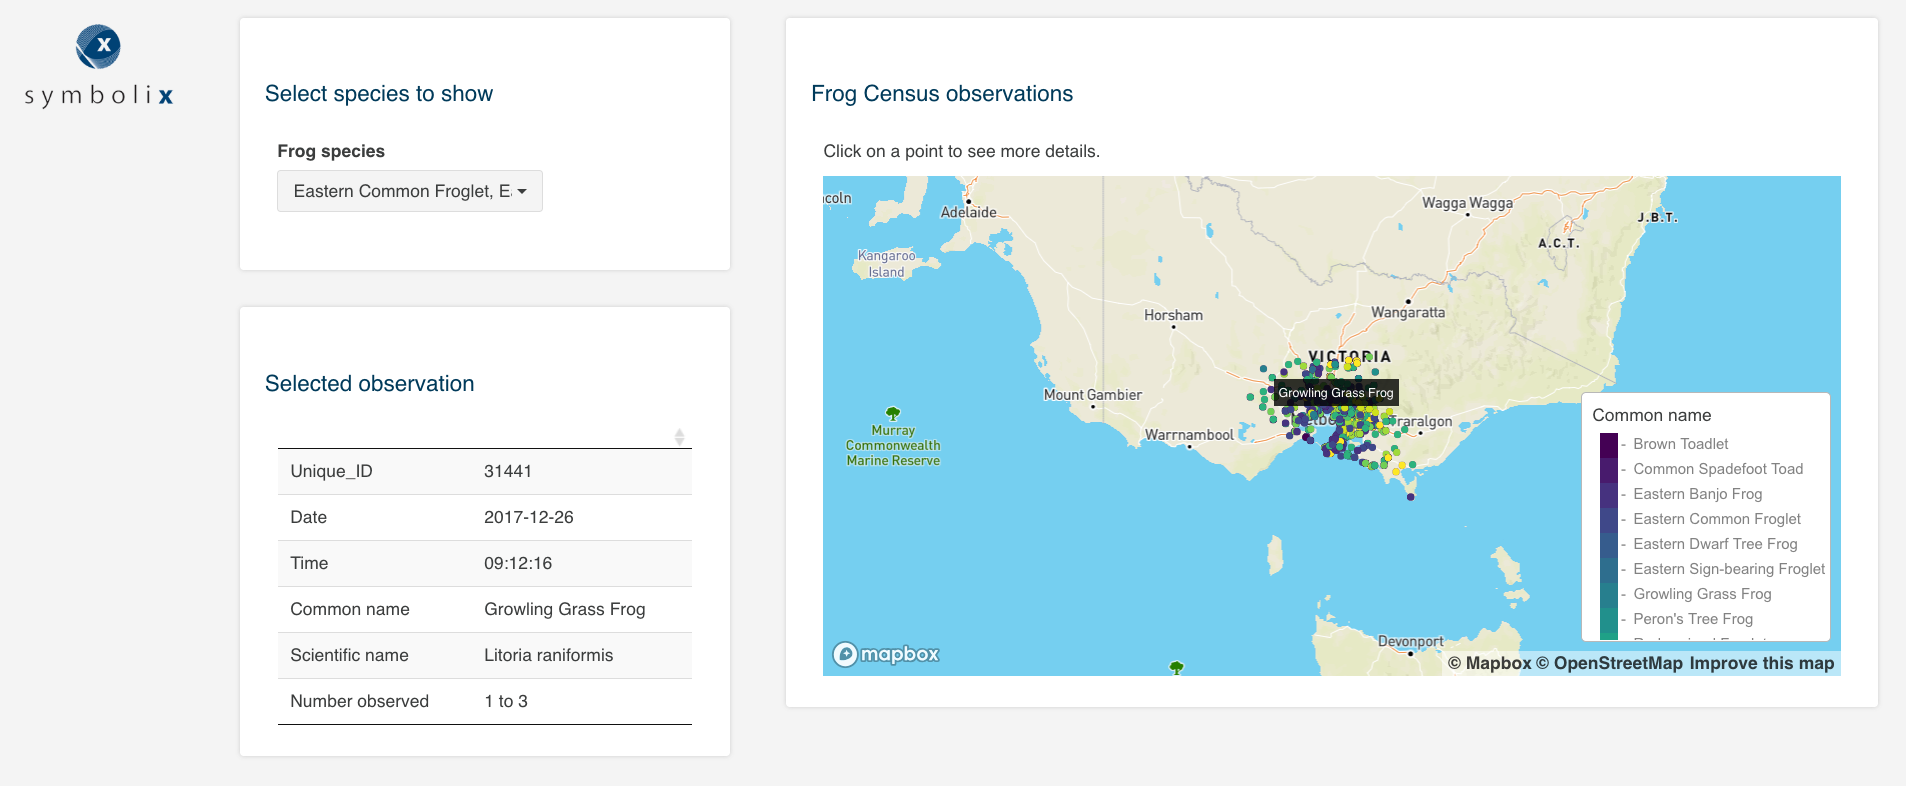
A simple Shiny app that shows the locations of frogs observed in the Frog Census.
Testing reactivity
If you’re familiar with Shiny, you’ll probably have experienced how frustrating it can be when the reactive flow of your app is not working as expected. Sometimes an observer isn’t triggered when you think it should be or something updates when it shouldn’t. In these cases, including tests of whether the reactives are all behaving as intended can help identify where the problem is.
Here is a portion of the server.R file from the Frog Census Shiny app shown above. After one or more
frog species are selected using a picker input (input$pi_species), a data.table containing all the
Frog Census observations is filtered to produce a new data.table
(rv_frogs()) with just observations for the selected species.
# Filter dt_frogs to include only selected species
rv_frogs <- reactive({
  req(input$pi_species)
  dt_frogs[Common_name %in% input$pi_species, ]
})
We can use testServer() to test whether changing the
selected species updates the reactive data.table.
To use testServer(), you must specify which function is being tested (in this case the server() function,
but this could also be a server function within a module). Input values are set using
session$setInputs and reactives defined within the server function can be accessed to make
sure they are behaving as expected.
This can be easily be turned into a test using test_that() by adding some expectations.
Here’s an example of how you would test that the filtered data.table rv_frogs() has the
expected number of rows and includes only the selected species:
test_that("Selecting a species filters observations", {
  testServer(server, {
             session$setInputs(pi_species = "Eastern Common Froglet")
             expect_equal(rv_frogs()[, unique(Common_name)],
                          "Eastern Common Froglet")
             expect_equal(nrow(rv_frogs()), 810)
  })
})
## Test passed 🥇You can also use the shinytest package for these kinds of tests, but it can be a little
more awkward. With shinytest you can only access the objects that the browser sees, whereas with testServer() all the internals of your server function are visible. This means that because
an reactive like rv_frogs() is not an output, shinytest won’t be able
to access it.
There is a way around this, however. We can export objects for testing purposes,
which makes them visible to shinytest. For example, we can export rv_frogs() by adding this line to server.R:
exportTestValues(rv_frogs = rv_frogs())This allows us to access this object and test it’s correct in a similar way as we did
using testServer(). We set inputs using the setInputs method.
test_that("Selecting a species correctly filters observations data.table", {
  app <- shinytest::ShinyDriver$new(here::here("R", "shiny_testing"))
  app$setInputs(pi_species = "Eastern Common Froglet")
  rv_frogs <- app$getAllValues()$export$rv_frogs
  expect_equal(nrow(rv_frogs), 810)
  app$stop()
})
## Test passed 😸Using shinytest here is slower and a little more difficult than simply
using testServer(), so in this case testServer() would be the better choice.
Testing reactivity within modules
You can also test the server functions within modules using testServer().
This works in almost exactly the same way as testing the server function in server.R, except that you also need to supply values for any arguments the module has.
Tests for modules have this basic structure (assuming example_server is the server function
in a module):
test_that("My module works", {
  testServer(example_server,
             args = list(
               arg1 = "value",
               arg2 = "value2"
             ), {
               # Add expectations here
             })
})
You can set input values and access reactives and outputs in the same way as in the earlier example. Additionally, objects that are returned from the module can be accessed using session$getReturned(). This can be
very helpful when you have a lot of communication between modules and need to be sure
you’re passing the correct objects between them.
Testing inputs without input bindings
If you use one of the standard shiny inputs like selectInput or checkboxInput,
the input value is set via input bindings. This is the case for input$pi_species
in the Frog Census app, which is set using shinyWidget’s pickerInput.
However, some inputs don’t have an input binding and these can be a little harder
to work with. This is the case for many htmlwidgets like DT and mapdeck. Interactions
with these components like clicking on a row of a table will set an input value,
but they do so without using an input binding.
For example, one of the inputs in the Frog Census app is a map click (input$map_scatterplot_click). This tells the app which point on the map has been
clicked and which observation to select and show in the table. However, unlike input$pi_species in the examples above, this input value is not set via an input binding.
We can nonetheless set a value for input$map_scatterplot_click and test
that this results in the expected behaviour using testServer().
Here is the part of the code that translates a map click into a row of the observations table:
rv_frog_selected <- reactive({
    req(input$map_scatterplot_click)
    lst <- jsonify::from_json(input$map_scatterplot_click)
    rv_frogs()[lst$index + 1]
  })
input$map_scatterplot_click is a JSON object. If I add a print statement to
print it out and click on a point, I can copy it and use it for testing. Setting
this as the value for input$map_scatterplot_click in effect simulates clicking on a point.
We can set the value for input$map_scatterplot_click in the same way we did for
input$pi_species above and then check the correct row of the observations
data.table is selected:
map_click <- paste0("{\"index\":91,",
                    "\"color\":{\"0\":92,\"1\":0,\"2\":0,\"3\":1},",
                    "\"lat\":-37.450509514532065,\"lon\":143.93925084270128}")

test_that("Map click selects correct observation from observations data.table", {
  testServer(server, {
    session$setInputs(pi_species = "Eastern Common Froglet")
    session$setInputs(map_scatterplot_click = map_click)
    expect_equal(rv_frog_selected()$Unique_ID, 29167)
    expect_equal(ncol(rv_frog_selected()), 6)
  })
})
## Test passed 🌈Testing JavaScript-dependent processes
In the Frog Census app, there is a modal dialog that appears if you de-select all species and warns that you must select at least one species.
This is what it looks like:
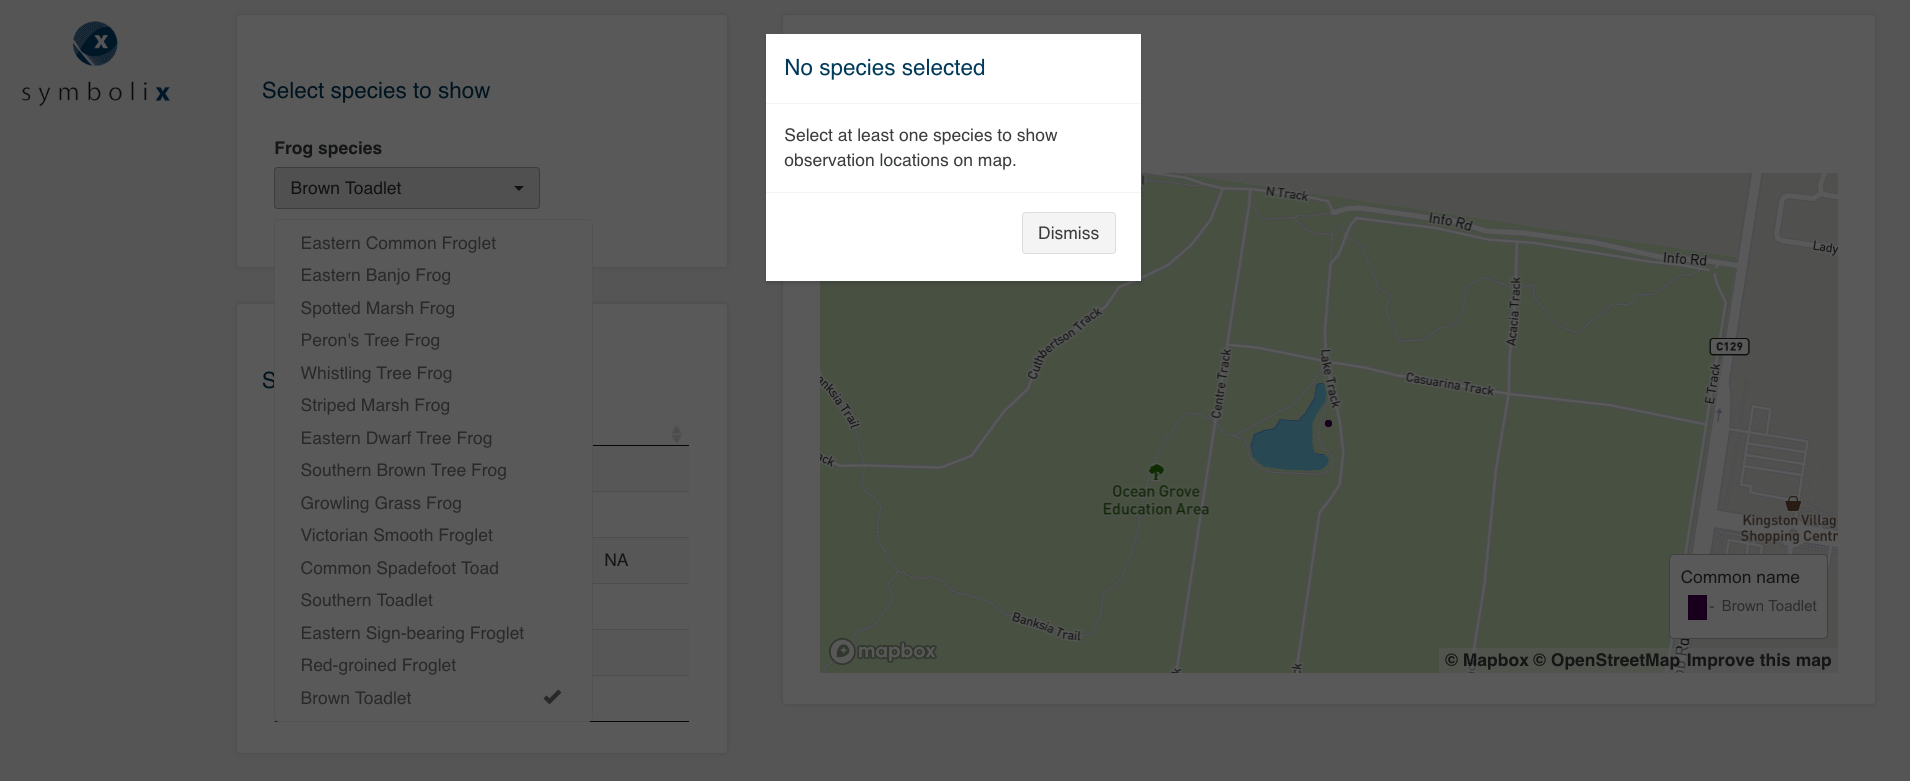
The Frog Census Shiny app showing the modal dialog box warning that at least one species must be selected.
The picker input is also automatically updated so that one option is selected. Here is the code responsible:
observeEvent(input$pi_species, {
  # Runs when there is no species selected
  if (is.null(input$pi_species) || length(input$pi_species) == 0) {
    # Generate modal dialog warning
    showModal(modalDialog(
      title = "No species selected",
      "Select at least one species to show observation locations on map.",
      size = "s",
      easyClose = TRUE,
      fade = TRUE
    ))
    # Update picker input so a species is now selected
    updatePickerInput(
      session = session,
      inputId = "pi_species",
      selected = "Eastern Common Froglet"
    )

  }
}, ignoreNULL = FALSE, ignoreInit = TRUE)
This is a particularly annoying functionality of the app to test manually, as it requires de-selecting every one of the frog species listed. Fortunately, automated testing makes this a lot easier.
The modal dialog and picker input update can’t be tested using
testServer() since both rely on JavaScript. We can see that if we set input$pi_species
to NULL it is not updated:
testServer(server, {
  session$setInputs(pi_species = NULL)
  print(input$pi_species)
})
## NULLHowever, if we instead use shinytest we can see that input$pi_species does
update:
app <- shinytest::ShinyDriver$new(here::here("R", "shiny_testing"))
app$setInputs(pi_species = NULL)
app$getValue("pi_species")
## [[1]]
## [1] "Eastern Common Froglet"For testing elements of the app that rely on JavaScript (such as updating inputs and default values for inputs), we need to use shinytest.
Testing visual elements using snapshot testing
We’ve now tested that our input value updates as expected, but we still need to test that the modal dialog appears. This is a little trickier.
For this we’ll use shinytest to take a snapshot (a .png file in this case) of the app after
setting the input$pi_species to NULL. We will then use testthat::expect_snapshot_file()
to test that the snapshot matches the reference snapshot already saved. If the test has never been run before, the first snapshot taken will be saved and will serve as the reference for future tests.
It’s important to look at it to confirm it actually shows the behaviour you want to test.
In this case, we want a snapshot of the Shiny app showing the modal dialog box warning that you must select at least one species.
Note that testthat::expect_snapshot_file() can’t be used to test interactively.
The following test code will only work if put in it’s own file (which I called test-modal.R)
and then run using testthat::test_file("tests/testthat/test-modal.R").
testthat::local_edition(3)
test_that("Modal dialog appears when no species are selected", {
  path <- tempfile()
  app <- ShinyDriver$new("../../")
  app$setInputs(pi_species = NULL)
  app$takeScreenshot(path)
  expect_snapshot_file(path, name = "modal_appears.png")
})
Here’s the snapshot taken, which shows the modal dialog box does appear. It looks a little different than the screenshot taken using my browser, but it does capture the behaviour I want to test (the modal dialog box):
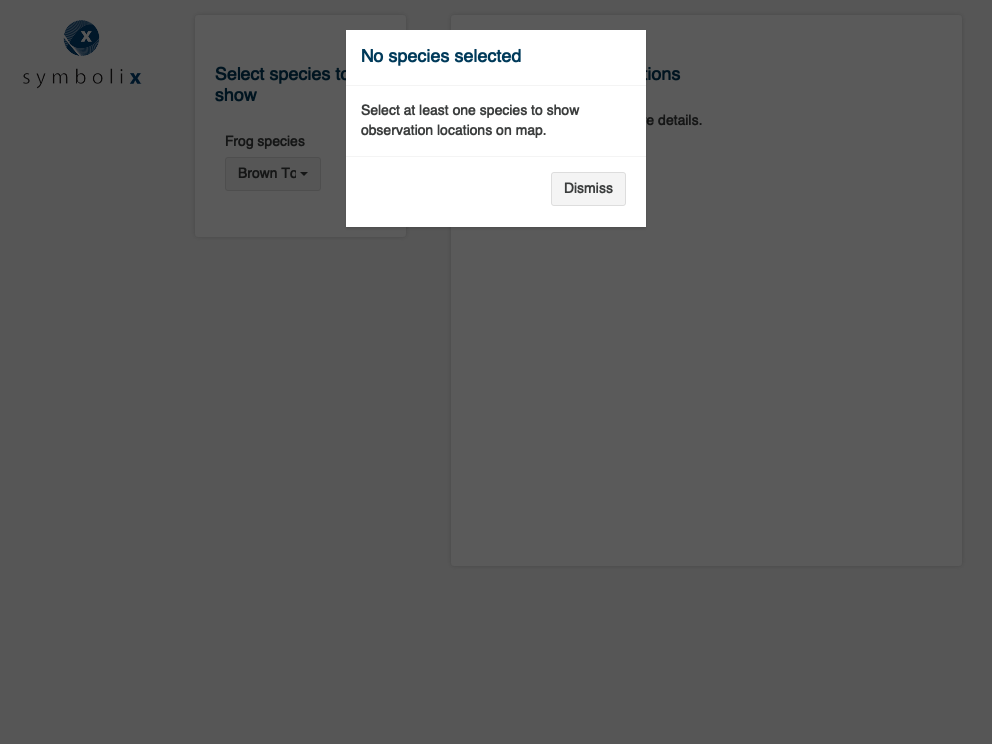
Snapshot taken using shinytest.
Although snapshot testing is the only way to test certain parts of a Shiny app, you should use it only when there’s no alternative. Even very tiny differences between snapshots will cause a test to fail, so simply running the test on a different computer can lead to a failed test.
Useful resources
These are some resources I found extremely helpful in learning about how to test Shiny apps:
- I highly recommend the chapter on testing in the Mastering Shiny book for a much more detailed discussion and useful examples.
- This RStudio article about Shiny testing that gives an overview and introduces some of the tools you can use.
- This RStudio article about testing server functions specifically discusses the
shiny::testServer()function. - The Vignette about snapshot tests using the testthat package is helpful if you want to use snapshot tests.
- The shinytest testing in depth vignette explains how shinytest works.